Friday, December 10, 2021

Fixing PaloAlto Firewall fail to send Telemetry files problem

 In this post, I will be talking about a problem that you may face with PaloAlto Networks Firewall.

the problem can be seen with log that is generated by the Firewalls while trying to send telemetry file and failing:

10>Dec 6 23:40:04 FMC-PA-820-PRMARY 1,2021/12/06 23:40:04,0120010412345,SYSTEM,device-telemetry,2561,2021/12/06 23:40:04,,send-failed,,0,0,general,critical,"Failed to send: file

the problem above is informing us about the existence of an issue in sending telemetry file to PaloAlto cloud.

what does this means?

The firewall collects and forwards different sets of telemetry data to Palo Alto Networks based on the Telemetry settings you enable. The firewall collects the data from fields in your log entries (see Log Types and Severity Levels); the log type and combination of fields vary based on the setting. Review the following table before you Enable Telemetry.

source: https://docs.paloaltonetworks.com/pan-os/9-0/pan-os-admin/threat-prevention/share-threat-intelligence-with-palo-alto-networks/what-telemetry-data-does-the-firewall-collect.html 

it means we have to fix this issue because it is important.

ok, so one thing to notice here is that the relationship between PaloAlto firewall and PaloAlto cloud is a client-server relationship and since this is going via the internet, authentication and encryption must take a place in this process so secure the connection between Client-Server.

which means we need to authenticate our firewall in order to get the telemetry sent to PaloAlto Networks Cloud.

how we are going to authenticate? the answer is via certificate.

what you need to get this certificate?

1. Telemetry must be enabled and this can be done like this > click on settings icon and enable and choose region. then commit


2. Support and access to support portal of PaloAlto

3. Serial numbers of your firewalls that suppose to be under support.

once you logged in PaloAlto support portal go to > Assets > Device certificates > Generate OTP

here you will must select the serial of the asset and then generate the OTP and copy it.

now you must go back to > Device > Management > Device Certificate > Get Certificate

paste the OTP and apply it, this should make you see success fetch status like below.


Note: above image shows after the certificate import done.

Once all of these steps finished, you should be able to generate telemetry file by doing this>

Device > Telemetry > settings icon > Generate.


I hope this was useful.

Samer R. Saleem

Thursday, December 9, 2021

How to enable Call Conference on CUCM?

 In this post I will be configuring Cisco Call manager to allow users to join a phone call to make a conference.

follow the following steps:

1. Login to CM Administration page

2. Go to Call Routing > Conference NOW

3. Add new > and configure something similar to the following:


Add a number that you will be dialing to join a conference like (*3000)

select the route partition, and choose the Music on Hold option if want to.

now note that for the number that you want to dial a conference with, it must have the following configs under End User.

Go to > End User > search a number like 1169 in my screenshot.

Add the following because it is really important: self-service user ID


without this step you will not be able to configure the one below:


Enable End user to Host Conference now must be ticked.

then add the access code that you will have to enter when dialing *3000


Now all you have to do is make a call using the extension: 1169 then use another extension and dial *3000, once you here the reply machine asking for the meeting number you must enter 1169 then you will have to enter the Attendees Access Code 123123

and you will join the call.


hope this helps!

Samer R. Saleem


Thursday, November 18, 2021

Ansible ad-hoc to show information from Cisco Switch

 Ansible proved to be a very useful tool that can make our life easier.

today, I am writing about my learning experience using Ansible and what my baby-steps toward the automation and programmability world of networking!

let's start with mentioning that Ansible has two ways (as I know) of configuration to interact with network devices or servers.

1. the short way > ad-hoc

2. the more advanced way > ansible playbooks

Ansible ad-hoc provides an easy and fast access to devices from your terminal and enables you to execute commands faster then the usual process, and also can help you access a list of multiple hosts at the same time and do stuff like gathering information in one line of command. 

here in my example below you can see how I used the ansible command to access a switch with ip of "10.211.10.36" and used some of the usual commands that we use on Cisco IOS to show configuration or information to do our daily tasks.


the ansible command I used was:

%ansible all -i ./hosts -m raw -a "show interface status" -u samer -k 

here the "all" means all the hosts ip addresses in the file name "hosts"

another output can be seen here below to "show arp" on the same switch:


while seeing the output like this seems very easy, but there might be some problems face you to get to the point that line of command can run without errors, so here is what I got and managed to fix with some google search:

1. Error about deffie-helman group between my MACOS and the switch which 

Fix:

Note: this error will be seen also when you try to make a direct ssh from your terminal to the switch without even using ansible, which makes it a problem in the ssh of the MACOS in this case and here is how to solve.

a. Go to cd /etc/ssh/ and use $sudo nano ssh_config

b. uncomment the following parts


c. paste the following at the end of the same file


save the changes and try to ssh again from your terminal, if that works then try your ad-hoc command and it should work fine.

2. Error about failing the connect to host via SSH and this showed up after fixing error 1 

Failed to connect to the host via ssh: mux_client_request_session: exitval sent twice\r\n"

Fix:

paste the following into the ansible.cfg file by using nano and then saving the changes

connection: local


I hope this was helpful 


Samer R. Saleem


Friday, November 5, 2021

Ansible Another Step Into Network Automation

 What is Ansible?

Ansible is a Network Automation tool, it works with YAML to push or get configs from a network device or group of devices or hosts.

Ansible works with SSH, which means you need to have NETMIKO or PARAMIKO installed along with your Python in order for Ansible codes to work.

how to Install Ansible?

simply by typing this command into your terminal (linux or MAC) $pip install ansible

you can then check your installed version using the command $ansible --version

like below:


Since we already mentioned that Ansible work with YAML as data modeling language, then this means we need to install YAML as well, you can install by:

$pip install PyYAML

below link shows more documents about YAML:

https://pypi.org/project/PyYAML/ 


NOTE: you might face problem while trying to run an Ansible code because of SSH keys between your Computer and the Network/host you are trying to connect to and this will cause an error similar to the following screen:


there is a workaround for this by adding some part in the configuration into the ansible.cfg file as below:


you can open a file and name it as ansible.cfg with nano

$nano ansible.cfg

then add

[defaults]

host_key_checking = false


save the file and run your ansible code again.


Ok, now onto writing a simple Ansible code to get_facts from a Cisco IOS device.

1. in order to do that, you need to have a list of hosts/host configured and that will be created in the same directory that I will be creating my ansible code from, which will be:

samer@Samers-MacBook-Pro ansibleproject % pwd

/Users/samer/Documents/ansibleproject


[cisco] is the group of devices/hosts, so it means you can list your hosts below just like Im listing (10.211.10.36) here for my testing.

[cisco:vars] as you can see is the other information like the OS and username and password of the device/host listed in group Cisco above.

Ok now let us create the Ansible code, which will be by creating a file that I named as test.yml (YAML) format file.


as you can see the file starts with (---)

then (-) name, group of hosts, connection type (SSH), then the tasks that ansible will be doing on the host (tasks:)

NOTE: white-spaces are really important and you will face problem in running the codes if you did not have the correct spacing. 

example of error caused by missing space:


Ok, so our ansible task will be to get the software version of the host (10.211.10.36) and this is done with the last task named "VIEW OS VERSION" which has the var: ansible_net_version

how to run the code now?

$ansible-playbook -i hosts testing.yml

Of course my terminal is already inside the same directory, if your path was not in same directory then you need to add the full path for the files.

(-i) here means inventory which means play ansible against the inventory in the path hosts and the ansible file is testing.yml

ansible will check the hosts/groups in the file called hosts and use the login information in the [var] to login to the host using SSH (NETMIKO/PARAMIKO).

once you fix all of the white-spaces issues and run the code, you should get the following screen of output:


The green screen! OK=1 and failed=0.


Note, you can use ad-hoc command for ansible to push fast commands and do things quickly on one host using the following format:

$ansible 10.211.10.36 -m raw -a "show version" -u samer -k

where k is prompt for password.

this is my introduction into Ansible for Network Automation.


good resources can be found here:

https://developer.cisco.com/startnow/

https://docs.ansible.com/ansible/latest/collections/cisco/ios/ios_command_module.html#examples

https://learningnetwork.cisco.com/s/question/0D53i00000mt0ZGCAY/mastering-ansible-for-the-devnet-associate-exam-derek-winchester


I hope this was useful.

Samer R. Saleem


Thursday, October 28, 2021

Access into Network Programmability

 It has been almost two months since I decided to start my studies to get my first certificate into the DEVNET path.

things were really confusing at first because honestly I knew nothing about the programming in general, I studied languages like Pascal in University, but that was longtime ago and lots has changed since then (2005-2009).

Knowing that studying programming in University does not necessarily means you are going to be able to make codes or become a programmer per se.

anyway let us talk about the networking world these days and how Cisco is contributing into making the new network engineering career and keeping it's  certified engineers at the top!


As we all know that working on big size networks can be really time consuming sometimes when it comes to routine tasks, things that you might get tasked to do by your manager that require lots of logins and typing lots of commands into switches/routers/firewalls.

and as we all know, many of our networks today are comprised of different products from different vendors.

this impose many risks in addition to the main one which is the time and effort required to do a tasks that might be very simple to achieve on one or two devices but the risk of making mistakes while working on huge network size is high.

this is why, many network engineers who had the programming skills were already trying to solve such problems using programming tools.

we all worked our way using things to make our jobs little bit easier by using Notepad to make scripts for commands and paste them into Network nodes.

this came up handy even in monster exams like CCIE.

in our work environments we might even used SecureCRT and sent commands to all tabs via Command window. 

but what if we have hundreds of a mixed products from different companies?

well, Cisco created a whole certification path to help us as engineers to understand and ease our tasks and save our time by learning new but not really new skills that will add up to our knowledge and support us to be more innovative, this is why Cisco DEVNET courses launched to teach us from zero to hero how to be in the new era of Network Engineering.

When Cisco published the free courses on Cisco Learning Network Site, the course had materials that teach you Linux, Windows, MacOS, VSCODE, Python, Git, GitHub and how to make your PC a Development Environment.

https://learningnetwork.cisco.com/s/learning-plan-detail-standard?ltui__urlRecordId=a1c3i0000005hsLAAQ&ltui__urlRedirect=learning-plan-detail-standard

You can learn about API and How to practically use Python to make codes that can actually help you in your daily tasks.

All of these mentioned above are standard and can work on any computer free and require nothing to operate.

Of Course the certificate will be joined with a training about Cisco products like Cisco DNA, and Cisco SD-WAN. 

Here is a look at the path of the DEVNET certification:

Image soure: Cisco.com

Cisco Has announced the Expert level recently as you can see the "New" above.

This all brings us to the moment where we ask ourselves, do you want to stay as legacy network engineer? or you need to move on and keep yourself updated? of course in IT field, you should always keep your knowledge fresh and up to date, otherwise, you should really think doing something else because IT world is never gonna stop evolving.

you should evolve as well or you are going to extinct.


Ok, so how adding programmability into networking skills going to help me in my work? in simple words, you can make one script that will help you configure or pull data from large number of nodes in few seconds, of course you will keep these codes and use them from time to time whenever needed! what about if they were from different vendors?

that is also ok because you can use libraries in python that can work on different vendors at the same time without the need to create a unique codes for each vendor.

examples: Using NAPALM to configure or get configuration from Nodes, check the list below for the supported vendors.

Image Source:napalm.readthedocs.io

More information about supported list of devices can be found in the link below:

https://napalm.readthedocs.io/en/latest/support/index.html


That being said, How I started my journey into this path? First of course I started with the denial phase, which is "I'm a network engineer and not a programmer!"

which is basically wrong, because network engineers do programming on daily basis while they do their work on any network device!.

anyway, once I had the courage to start, I started with Practical python learning, which is get the code, even if it's copied entirely from a site, I would do it just for the sake of trying a code and see how it works.

My training started with a very cheap course that I got from Udemy for 11$, this course came out handy! I actually used a code to get all serials for a small inventory job which was done in a matter of seconds! (of course making the code work took some work and time to execute :p, but still I can use it in coming tasks and will spend no time to make it work).

Ok, so this was my first course, and the important thing is how you find the Video/Books or blog or anything that will give you the spark to start understand and love the thing that you have been procrastinating to get your hands dirty with!.


every person learns differently, some people like to read books first and some prefer to study by video first. Well, I am the type of video first learners, I like to know what I'm going through before I start, which means I have to watch the videos first and then books.

It does not matter, just do what makes you comfortable and makes study easy.


Another good resource to study for the DEVASC would be the Official certification guide book by Cisco press, if you get the premium edition, it will be joined with a test engine that you can use to test yourself with its question which comes in a multi-choice form.

the book goes through the blueprint and explains the topics in each chapter, you see python and Cisco DNA, API and REST and SD-WAN, JSON and XML YAML and YANG RESTCONF and NETCONF.

The crucial part of preparing your development environment is choosing the system you will work on, is it gonna be Linux or windows or MacOS? I have seen many people recommending Linux Ubuntu, and Cisco video courses does go through the setup of Ubuntu as a workstation for such a thing, but I chose Windows and MacOS.

basically MacOS is the most programming friendly environment IMO.

so why go to Ubuntu? of course it does not hurt to learn linux but in my case I want to most stable system.

next, you will need to decide how you will practice and run your codes? because you can use VSCODE to make codes and send to a real/lab nodes directly, but also GNS3 is great option to do your labs, especially the option to download network automation appliance that comes with all needed tools ready to use. (you can search it and find it on GNS3 site).

personally I prefer both, GNS3 and real equipment because once you make sure your script is fine, you can make some use of it.

there is a list of requirements that you need to make sure to download and install on your environment whether it was linux or windows or MacOS.

the list is but not limited to: Python (latest version)

Ansible, Paramiko (netmiko), telnet library, NAPALM, PyATS, YANG, JSON....etc. 

Note that with all the pros of network programmability there is of course cons, because we cannot exclude the human error factor from this, imagine running a code for a number of devices with some mistake in the code, this is going to be catastrophic to some environments.  

This is my journey toward Cisco DEVASC, it started and not going to end until I achieve my goal and pass the exam.


Will be updated soon!


Samer R. Saleem


Monday, October 25, 2021

Product review (Cisco CBS250 Switch)

 In this post, I will be reviewing my notes and experience during my work on new switches from Cisco.

the switches that I used to replace old HP switches with.

first of all, the Cisco CBS250 switches has nice white color and beautiful Cisco logo, they come with different sizes supporting from 8 to 48 ports and of course the SFP's.

have a look on a real photo for the product:


link to these products:

https://www.cisco.com/c/en/us/products/switches/business-250-series-smart-switches/index.html?ccid=cc001531


Price starting from: $235.00 USD

Ok, now let's start talking a little bit on the configuration part of the switch:

1. It supports GUI (which is very nice and well structured)

2. SSH and Telnet (Remote)

3. Console

 The switch also comes with a default username and password of (cisco), which you will be requested to change both after your first login.

one of the nice things I noticed is that the switch also has the automatic Baud rate detection, which will allow you connecting to switch without even altering your serial configs.


Don't mind the rubbish at the first line, this shows up during switch bootup because the auto detection is not active yet.

 So now let's talk about Network features, starting with the commands that you will need to configure the switch in order to make it ready for work.

1. Add a hostname using the command #hostname xxxxxx

2. Enable SSH if you are willing to connect to it via the SSH #ip ssh serve

then you need to go to:

#line ssh   (no more VTY)

(config-line)#login authentication default  (this will make the switch work with the default authentication method configured)

3. set the management IP address #interface vlan x     #ip address x.x.x.x x.x.x.x

4.set the gateway #ip default-gateway x.x.x.x

Note: at this moment, you would be also able to login to the switch using HTTP/HTTPS (GUI) but of course you need to set the IP address for the management.

Creating the vlans can be done at the beginning because you need to have them ready before you configure the SVI.


So now we talk about the Voice VLAN, which you must identify in the switch.

#VLAN 34

#voice vlan ID 34

So might need to add the OUI of the phones if it was not listed in the OUI table:


Ok, what about the switchports access type? well, below the types you can configure a port according to your needs:

1. Access  (vlan unaware port)

2. Trunk (vlan aware port)

3. General (generic port mode)

4. Customer (customer equipment port)


Note: by default the Switch comes with a Macro enabled and will put interfaces into vlan's automatically and even add a description, but in my case I had to disable it and configure ports according to my requirements.

here is how you disable the Macro globally:

#no macro auto

or you can disable per interface:

#no macro auto smartport

you can also create your own macro:

(config)#macro name SAMER

Ok, which mode to put your interface you need to configure, because for end users usually you need ports to be access ports, but since you need a phone then we used to have switchport voice vlan command before but now, this command is no longer available.

you have the following options:

1. automatic configs using the Macro

2. configure port as trunk (I don't think this is a good idea)

3. configure the port as general mode and use the (tagged option for the voice vlan)

and untagged for the PC and then PVID of the PC vlan.


in case you you won't be needing the Phone with your port then make it as Access mode only.

and of course the Uplinks must be Trunk.


here is an example:

interface GigabitEthernet1
 description DESKTOP
 port security max 2
 switchport mode general
 switchport general allowed vlan add 110 tagged  (Voice)
 switchport general allowed vlan add 16 untagged (User PC)
 switchport general pvid 16
 no macro auto smartport

 Lot's of configuration syntax has changed. for example, port security is not like before:


the modes changed permanent and lock  (not sure if this was changed longtime ago or I just didn't use Cisco switches for a longtime!)

 I found that removing the tab option which shows the options of the syntax for the available commands or completes the command is a bit annoying because it is not working like before.

 Overall, Cisco Switches always great, hardware and software and also the communities that can respond to your questions are really great.

you can't find this on other vendors forums.


Lastly
I want to talk about the GUI which I found pretty nice:

 you can choose HTTPS from the window itself as below


 The design is well structured as you can see below and the interface is really interactive:


Well, this is all I have for now, I hope this was useful!


Samer R. Saleem


Saturday, August 28, 2021

An intro. into Network Programmability

Hello everyone and I hope you are doing fine during this time where we all fighting to get our freedom and life back from the side effects that was caused by the COVID-19 events.

Today my post is about something I was doing recently which we all need to move forward and accept it as a vital part of our career development. which is learning python for network engineers.

as you all know, this has became a part from the blueprints and practical day to day work requirements to understand and use programmability of the networks.

Many programming languages exist but myself and many other network engineers if not 99% of us love working with Python. one of the reasons are:

1. Easy to learn and understand Python.

2. Network supporting libraries availability.

3.On systems like Linux and Mac OS Python comes preinstalled.


Okay, so since I knew that it was a must to start learning programming, I was in the phase of accepting this new challenge to simply reason which was (I HATED Programming) and of course this was due to learning in University and the languages we used to learn (Pascal back then). which did not make any sense to me and could not progress in it at all.

But after a while, I started pushing myself to learn and the challenge was (where to start?).

Of course learning ability and learning ways are different from one person to another, some people like to start reading on oppose to learn from a video, others are video learn first then book.

I'm latter type of people, so I started looking for video series that can help me learn python and especially network engineers type of learning python.

So my first go to option was (Udemy.Com) where I searched and found David Bombal's training series.(you can find lots of videos on YouTube as well)

and it was really good purchase compared to the price and the material quality.

 Started watching the videos at first which all was about 2-5 minutes long videos, which you think "that is short video!" but try again when you hate something and try to watch it for a minute.

As soon as David started explaining the need for learning programming language and it's benefits to us as network engineers, I started to realize how important it is and how important to learn it.

Basically you can make your daily tasks, the boring type of tasks that require you to login all devices one by one and collect simple information from each device an easy task and can be done in few seconds.

watching when you run a code to do it's magic in one click is amazing, thinking back about when I was still studying and preparing for my CCIE lab exam, and remembering time inside exam to use NotePad to make configuring devices fast and easy. learning python is sure an easy task to do giving it's value to help you configure hundreds of devices in no time.(Don't you think using notepad is kind of programmability?)

I remember  reactions from people here and there saying that I can't learn python and I can't be programmer and also programmers are going to take our jobs, or saying I'm too old to learn Python (which unfortunately some were a role models to network engineers from all over the world).

This does not make any sense and far beyond truth, no programmer is going to replace network engineer because programmers still don't know what is the commands that a network device can understand or which protocol to use and where and why!

In addition, Information technology in all of it's aspects and sections continue to develop everyday and we must keep ourselves up to date when it comes to knowledge, BTW this applies to everything around us because every profession requires updates, this is normal and we have to accept it!

This is kind of nonsense and you as a network engineer must not fall into this, go and seek knowledge 

by yourself, explore the subjects before deciding what is good or bad of hard or easy. you must be able to adapt new changes and continue learning.

I have finished the training and going beyond this training to finish a book that I bought from CiscoPress.com which is Cisco DEVASC Official Certification Guide. which I will be reading cover to cover now and practice everything in it, this is my next certification goal.

If you don't know what is Cisco DEVASC then go to the following link:

https://www.cisco.com/c/en/us/training-events/training-certifications/exams/current-list/devasc-200-901.html

My last advise to you is to go ahead and start your python learning, you will see the relief you will get after you start using the codes you write. seeing progress through your study is amazing as long as you are doing it the right way, Python and any other programming language is to practice while studying and make mistakes because you will learn the most from your mistakes.

In my next posts, I will be sharing my progress and some of the codes that I practiced on while studying.


So here are links to my study resources in my DEVNET journey:

1. David Bombal's video series

2. Cisco OCG DEVASC https://www.ciscopress.com/store/cisco-certified-devnet-associate-devasc-200-901-official-9780136642961

3. Network Programmability and automation fundamentals  https://www.ciscopress.com/store/network-programmability-and-automation-fundamentals-9781587145148

4. Cisco Learning Network DEVNET Study group https://learningnetwork.cisco.com/s/topic/0TO3i0000008jY5GAI/devnet-certifications-community

5. Cisco DEVNET Courses are also available https://developer.cisco.com

6. Video Course from Cisco Devnet https://developer.cisco.com/video/net-prog-basics/ 

I hope you find my post useful and motivating!


Samer R. Saleem


Saturday, July 10, 2021

BGP Message Types logs and PCAPS


Introduction:

BGP stands for Border Gateway Protocol, as the name implies it is a protocol that works on our network border devices, BGP is a an application layer protocol and it does work with TCP protocol 179 to establish it's peering connection with neighbors.

BGP is the internet protocol, all external routing protocols that used and exchanged on the internet are with the help of BGP.

you can check BGP is "application" here:


as stated above (Routing protocol is "Application")


 BGP version4 does support Multi-protocol BGP which means (IPv6, L2VPN, IPv4, VPNv4, VPNv6)

BGP RFC 4271 link > https://datatracker.ietf.org/doc/html/rfc4271 

You can see the BGP version from the command show ip bgp summary below under the letter "V":


NOTE: BGP Version is not the same as BGP table version.


We are going to create a small lab for BGP using Cisco IOS and Cisco IOS-XE using GNS3.

This is going to be the topology:


As been mentioned that BGP uses TCP to establish connections with neighbors, check below pcap for the connection between two routers:


BGP messages exchanged between the Routers will be and of course will continue to be exchanged between the peers are:

1.OPEN messages (establishing TCP Connection)

2.UPDATES (Updates of prefixes advertised or withdrawn)

3.Keep Alive message (it is like a hello message to make sure peer is still alive)

4.Notification message(when error happen in the connections)


These messages can be seen in two ways:

1.Debug on the routers

2.Packet Capture 

We are going view both of them here below:

#debug BGP all

*Jul 10 06:15:19.833: BGP: ses global 12.12.12.2 (0x7FA8710B3168:0) pas Enhanced Refresh cap received in open message

    Line 2: *Jul 10 06:15:12.352: BGP: ses global 12.12.12.1 (0x7FA84FFADDB0:1) Send NOTIFICATION 6/4 (Administrative Reset) 0 bytes
    Line 4: *Jul 10 06:15:12.352: BGP: ses global 12.12.12.2 (0x7FA8710B2D08:1) Send NOTIFICATION 6/4 (Administrative Reset) 0 bytes
    Line 5: *Jul 10 06:15:12.352: %BGP-3-NOTIFICATION_MANY: sent to 2 sessions 6/4 (Administrative Reset) for all peers


CSR#debug ip bgp updates


*Jul 10 06:21:01.715: BGP(0): 12.12.12.2 rcvd UPDATE w/ attr: nexthop 12.12.12.2, origin i, metric 0, merged path 2, AS_PATH
*Jul 10 06:21:01.715: BGP(0): 12.12.12.2 rcvd 123.123.123.1/32
*Jul 10 06:21:01.715: BGP(0): Revise route installing 1 of 1 routes for 123.123.123.1/32 -> 12.12.12.2(global) to main IP table
*Jul 10 06:21:01.715: BGP_Router: unhandled major event code 128, minor 0
*Jul 10 06:21:01.717: BGP(0): 12.12.12.1 NEXT_HOP is on same subnet as the bgp peer and set to 12.12.12.2 for net 123.123.123.1/32, flags 200, sb: C0C0C00, mask: FFFFFF00
*Jul 10 06:21:01.717: BGP(0): (base) 12.12.12.1 send UPDATE (format) 123.123.123.1/32, next 12.12.12.2, metric 0, path 2
*Jul 10 06:21:01.718: BGP(0): 12.12.12.1 rcvd UPDATE w/ attr: nexthop 12.12.12.2, origin i, merged path 1 2, AS_PATH
*Jul 10 06:21:01.718: BGP(0): 12.12.12.1 rcvd 123.123.123.1/32

As you can see above, we have notification, updates, open message, below the keepalives>>>

#debug ip bgp keepalive

*Jul 10 06:22:43.252: BGP: 12.12.12.1 KEEPALIVE write request serviced in BGP_IO
*Jul 10 06:22:43.252: BGP: 12.12.12.1 service 1 read request in BGP_IO
*Jul 10 06:22:43.990: BGP: 12.12.12.2 passive KEEPALIVE write request serviced in BGP_IO
*Jul 10 06:22:43.990: BGP: 12.12.12.2 passive KEEPALIVE requested (rcv_open)
*Jul 10 06:22:43.990: BGP: ses global 12.12.12.2 (0x7FA879168DC8:0) pas service keepalive IO request.
*Jul 10 06:22:43.991: BGP: 12.12.12.2 passive KEEPALIVE write request serviced in BGP_IO
*Jul 10 06:22:43.991: BGP: 12.12.12.2 passive service 2 read request in BGP_IO

*Jul 10 06:22:43.991: BGP: 12.12.12.2 passive received KEEPALIVE, length (excl. header) 0

*Jul 10 06:22:43.991: %BGP-5-ADJCHANGE: neighbor 12.12.12.2 Up

The other way is to use the PCAP using wireshark capturing on GNS3 (this is of course in lab environment):


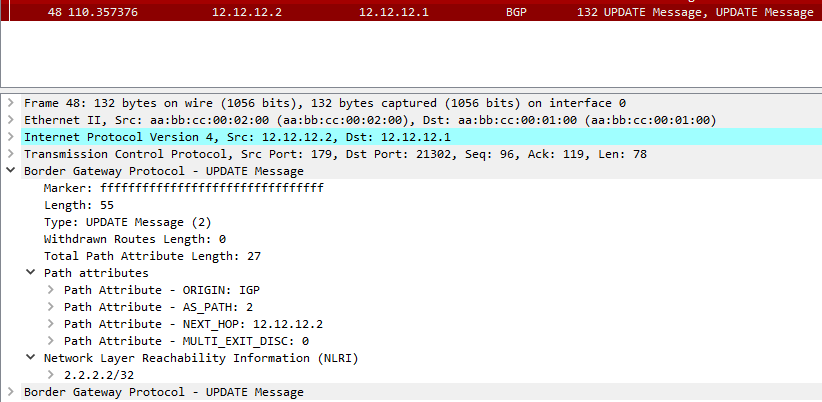
Let's check the update message here and see what does it contain.


As you can see here, the NLRI is being advertised in the update message and it has Router2 loopback prefix (2.2.2.2/32) as it is being sent to Router1.


I hope this was useful for you!


Samer R. Saleem.


First Image Source: Cisco.com


Tuesday, July 6, 2021

Top 70 networking blogs on the internet

First, I want to take the chance and say thanks to feedspot.com for selecting my blog as one of top 70 networking blogs on the internet It was nice to see an email from feedspot.com in my inbox this morning!


Feedspot.com is a website that has index for many great blogs on the internet.

Here is A little introduction of feedspot.com 


Feedspot Reader helps you find and keep track of interesting stuff on the web. You can subscribe to your favorite websites, and keep up with what's popular. New content comes to your Feespot Reader when it's posted, so you don't need to visit individual sites.

Plus, Reader keeps track of which posts you've read, so you only see unread posts when you come back. Unread posts appear bold. As you read, Reader will mark the post as read.

You can visit the link below and have a look at many blogs and recommended sites!


https://www.feedspot.com/

Here is also a list created by feedspot.com listing 70 of top networking blogs on the internet!

https://blog.feedspot.com/networking_blogs/

Enjoy surfing!

Hope this was useful!

Samer 


Monday, July 5, 2021

CSMA/CD quick post

One of the topics that we need to understand which will happen on our daily tasks maybe even without knowing it is really happening.

we are talking about collisions and how and when they happen on a network.

let's take the two topology below and compare what will happen in each of them.


As we all know, HUB is an old device that used to connect devices (Computers, Printers) together in a shared network.

the HUB is not smart enough to prevent problems like loops or collisions and it is not manageable and still work with one vlan or any vlan that comes from another attached network.

This is why, in our networks today we don't use Hubs no more. and switches replaced these hubs.

ok, so let's talk about collisions.

Simply, they happen when two or more devices talk (send frames) at the same time. this can easily happen on the Hub devices, simply because they don't have any mechanism to prevent this.


on the other hand, stations do have a feature which was created to limit these collisions and it is called CSMA/CD.

which stands for (Carrier Sense Multiple Access/ Collision detection)

The devices connected to Hub ports will sense the traffic on the shared medium and send frames when there is no frames sent by other devices.

If there is a collision, all ports will send jamming signal to stop sending more frames.

this jamming signal will then ends, and each part of the collided frames will wait for a timer before sending more frames again, these timers will be randomized by each device to make sure no collision happens again. Hence the name of MAC came from (Media Access Control)

A better option than CSMA/CD is CSMA/CA which stands for the same but instead of detection, we have Collision avoidance here, in which a computer will send like a test frame to see if there is any senders then continue sending frames to destination so this can lower the collision chance even more.

So this will be done by computers as a feature working in layer2 to solve some of Hub problems.

This however is not the same on switches, where each port is a separated collision domain from the rest of the ports.

Hope this was useful.


Samer R. Saleem


Saturday, June 26, 2021

Time Based Access Control List on Cisco Router/EIGRP

 In today's post, we will work on creating an Access Control List that works in specific time that we decide, this could be useful for a cases that you want to filter traffic according to that time you set 


In many cases you can use this time based ACL, so let's create a simple lab showing the use of it.


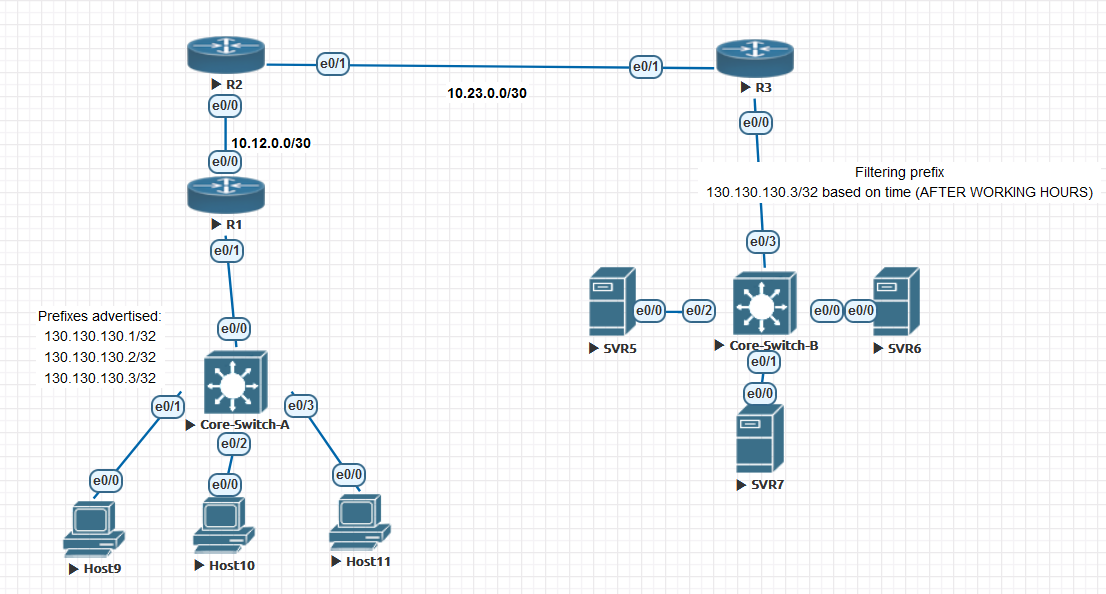
First, as usual we will use a simple topology because there is no need to make thing complicated, all you need is three routers or layer3 switches


In my lab, I will be using three Cisco Routers with 15.4T IOS version.


 Topology below:


 In the topology above, R1 hosts 9, 10, 11 will be advertised as a loopback prefixes from R1.


we will filter the access for these hosts inbound to Site-B  on R3 to stop unwanted traffic after working hours to SVR5, SVR6, SVR7


 in my example, I will filter only one of the IP's for the sake of explanation to make sure the rest of hosts have reachability after the filtration.


After configuring EIGRP between the three sites, we can see the routing tables with prefixes for the advertised networks

on both sides.


 As you can see above, the host that we will filter is 130.130.130.3/32, we will configure any time that we like the policy 

to start working in it, then we will monitor our logs.


remember it is better to enable logs with the Access list that we will configure in order to see the hits on the policy for the matching

packets.


 Note: the Time based ACL will only be in extended Access Control lists and not in standard.


Now, it is time to define the time range that will be used in access list.


 Commands are:


time-range AFTER-WORK
 absolute start 08:25 26 June 2021

 absolute end 08:43 26 june 2021


the Access list configured as below:

 #ip access-list extended TIME
 #deny   ip host 130.130.130.3 any time-range AFTER-WORK log
 #permit ip any any time-range TIME log


apply it inboung on E0/1 or Router3 and check if its active:


here you go, we have hits on both lines, where we generated some ICMP packets sourced from 130.130.130.3/32

and the permitted log matches the other traffic which include EIGRP packets as well.


As you can see, the packets not reaching the 5.5.5.5/32 SVR when the source of the ICMP is 130.130.130.3/32


 Here above you can see the logs generated by the hit on R3 for both the denied logs and permitted EIGRP packets.

Note: before the time range is activated, it should be seen as inactive as below:


Ok, please note that you must put end option to the time-range settings:


 #time-range AFTER-WORK
 #absolute end 08:42 26 June 2021


 which will put the ACL back to inactive state.


Ok, what about making this task automated? the answer is also by using time-range but with another option which is:


That was it, I hope you enjoyed this post!


Samer Rafid Saleem


Python-Jinja template configuration generator for Cisco devices and printout configs to external text files

 In this post, I worked on collecting a code that works with Jinja template. the nice thing in working with Jinja is that you can have basel...