Showing posts with label FIREWALLS. Show all posts

Thursday, September 14, 2023

Fetching Firewall Data Using cURL and Postman for API Access

 you can use curl from your terminal for example:

samer@Samers-MacBook-Pro ~ % curl -X GET 'http://192.168.1.250/api/?type=op&cmd=<show><system><info></info></system></show>' -u "api:password@199"

note that the -u the two words api and password@199 are username and password to authenticate the session while trying to fetch data from firewall while using CURL.


or, you can use the Postman app.


Wednesday, January 5, 2022

Network Engineering and Automation Questions for review or prepare for Interview


Hello everyone,

As you know, many of us study and struggle a lot in order to reach the level where we can call ourselves Network Engineers, however studying and learning process is not enough because we will forget what we studied after a while if we don't use it, and while trying to learn new things and stay up-to-date, landing new jobs will need to stay fresh on many of the networking topics.

you might be a great network engineer, but you will not be able to get the job based on incomplete answers about topics you already know but forgot how to talk or explain them in an interview.

I was thinking to make a Anki flashcards for Network Engineers that are willing to apply for a job or review networking topics, so I started working on this and the below link contains the file that I will continue to update and re-upload on daily or weekly bases.  

https://drive.google.com/file/d/1wboDLmZeL1DL_onoDCpt05Pc_7wBq79s/view?usp=sharing


This file contains the following topics:

1. BGP

2. OSPF

3. Network Automation

4. Devops

5. MPLS

6. TCP

7. EIGRP


you can download then open with ANKI software on your computer.

anki software > https://apps.ankiweb.net/


I hope you benefit from it. 


Samer.


Friday, December 10, 2021

Resolving Telemetry File Sending Issues on Palo Alto Networks Firewall

 In this post, I will be talking about a problem that you may face with PaloAlto Networks Firewall.

the problem can be seen with log that is generated by the Firewalls while trying to send telemetry file and failing:

10>Dec 6 23:40:04 FMC-PA-820-PRMARY 1,2021/12/06 23:40:04,0120010412345,SYSTEM,device-telemetry,2561,2021/12/06 23:40:04,,send-failed,,0,0,general,critical,"Failed to send: file

the problem above is informing us about the existence of an issue in sending telemetry file to PaloAlto cloud.

what does this means?

The firewall collects and forwards different sets of telemetry data to Palo Alto Networks based on the Telemetry settings you enable. The firewall collects the data from fields in your log entries (see Log Types and Severity Levels); the log type and combination of fields vary based on the setting. Review the following table before you Enable Telemetry.

source: https://docs.paloaltonetworks.com/pan-os/9-0/pan-os-admin/threat-prevention/share-threat-intelligence-with-palo-alto-networks/what-telemetry-data-does-the-firewall-collect.html 

it means we have to fix this issue because it is important.

ok, so one thing to notice here is that the relationship between PaloAlto firewall and PaloAlto cloud is a client-server relationship and since this is going via the internet, authentication and encryption must take a place in this process so secure the connection between Client-Server.

which means we need to authenticate our firewall in order to get the telemetry sent to PaloAlto Networks Cloud.

how we are going to authenticate? the answer is via certificate.

what you need to get this certificate?

1. Telemetry must be enabled and this can be done like this > click on settings icon and enable and choose region. then commit


2. Support and access to support portal of PaloAlto

3. Serial numbers of your firewalls that suppose to be under support.

once you logged in PaloAlto support portal go to > Assets > Device certificates > Generate OTP

here you will must select the serial of the asset and then generate the OTP and copy it.

now you must go back to > Device > Management > Device Certificate > Get Certificate

paste the OTP and apply it, this should make you see success fetch status like below.


Note: above image shows after the certificate import done.

Once all of these steps finished, you should be able to generate telemetry file by doing this>

Device > Telemetry > settings icon > Generate.


I hope this was useful.

Samer R. Saleem

Monday, June 7, 2021

Change Global Protect portal logo

 It is nice and good idea to replace the Global Protect logo to your company logo.

to be more professional and to give better impression about your company attention to details.


in this post, I will be showing you how to do that:

First of all you need to have global protect portal (web based VPN page) enabled.

go to : Network > Global Protect > Portals > General

As you can see  > you should have the interface (outside) and it's IP address 

under appearance: Portal Login Page is set to customized-page.html


Note, in your case you would not see the custom page in the drop list because you did not create it yet.

here is how to create this page:

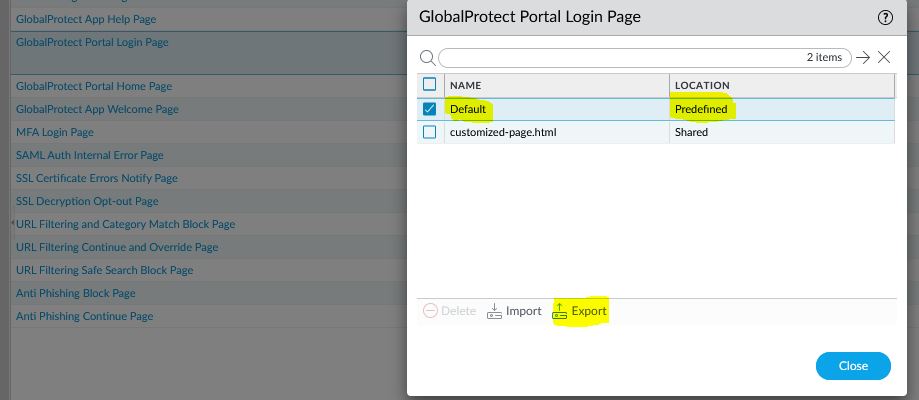
Go to Device > Response pages >

you will find a list of pages used in your firewall, find and click on Global Protect Portal Login Page

then, select the "Default" and export as shown in the image below:


Once you downloaded it, you can open the ".html" page that you downloaded and edit with texteditor

as you can see below:

change the image source to a different source than the original one, in my case I'm recalling it from the link of a server lab, you can see the highlighted link below:


 once you finished editing this page, save it as (NAME.html)

Go again to Response Pages and select Global Protect portal login page:


Now you can go to the first step and select the new customized page from the drop list and commit your configs.

Hope this was useful!

Samer R. Saleem

Thursday, June 3, 2021

Security Policy Testing on PaloAlto Firewall

Firewalls in an active working environment will always be susceptable to change in configuration, hosts will be added to new policies and removed later, or added to one or more of the security policies at the same time, this of course will cause some problems at some point, especially if the rule hits were not as intended to be and some server or IP will lose access to internet or DMZ.

Here we will see how to find out if the same host was added to one or more security rules by simulating a trace which is similar to packet tracer of the Cisco ASA firewalls to some extent. 

How to test your configuration for a specific host to see in which policy it might be?

What if the host was used in more than security policy?


Security Policy Testing on PaloAlto Firewall

How to know If there is conflict for the same host?


There are two ways for the same test.

A.    Go to Device > Troubleshooting

B.    Go to Security Policy > Select “Test Policy” which can be found at the bottom bar


Both of these options will do the same thing.


So let’s see how it works.

Using option B, we are going to press on the test policy option which you can see "in the right corner of the screen"

we will start filling the details:

1. Source interface (Inside, outside, DMZ) in our case it is (Inside)

2. Destination Interface (Insidde, outside, DMZ) in our case it is (Outside)

3. Select the protocol type (TCP, UDP, ICMP) for this example we are going to use (ICMP)

once you selected the ICMP, the destination port is no longer needed.


Here as you can see below, our source will be a host that was added previsouly to a security rule named (DIRECT-INTERNET-ACCESS) and the ip address of this host is (10.211.112.2)

The destination in our policy is Google (8.8.8.8)


there is another useful option that can be seen in the screen below:

"Show all potential match rules until first allow rule"


once you entered all details as the in the screen, you can scroll-down to "excute" option and press it, right away you will see the "test result" showing the matching rule "Direct-Internet-Access"

Now you can select this rule and check out it's "result details" tab on the right.

scroll-down to the end, now you can see if the Action is "Allowed or Denied"

Type is "interzone or universal" 


You can then see if there is duplicate for the same host IP with another rule that might cause a hit and prevent the host from working in another intended way, and resolve the misconfiguration.


Hope this was useful!


Samer R. Saleem


Friday, May 14, 2021

Enable sending PaloAlto Firewall logs to Email Account

 If you are using PALO-ALTO Firewalls, which they are great products according to my experience, you would not want to be connected all the time to check events/threats and monitor the everything all the time.

this would be time waste and of course you will not get better benefits from sitting the whole time in front of the screen.


Other way is enabling log forwarding to an external receiver.

the options available to forward the logs are as below:

1. SNMP

2. EMAIL

3. SYSLOG

4. HTTP

Creating Log forwarding, select the option and click on ADD:


Go to Objects > Log Forwarding > Add

Now add the information below:


Select from the Log type drop list> I'm selecting threats which will check vulnerabilities and Viruses and File checking and this of course will include Wildfire submissions as you can see in my email list below


A great option to use here will be EMAIL, you can send threats for a specific rule to your EMAIL Inbox.

For Example, an important rule like incoming rules used to allow emails coming inbound to Exchange server or security policy rule for the traffic allowed to hosts accessing internet.


you will be able to add the option to get alerts for threats coming in emails for example.

here is how to enable the Log forwarding to email:

you should see a drop list under the option Log Forwarding:


at the end this what you will start seeing in your email feed:

The type is threat, source IP and destination IP, the name of the policy which in my case is INCOMING-EMAIL, Logset which is the log type we chose as logging forward to email


you can do the same for any log forward enabled policy.

Hope this was useful!

#CCIE #NETWORKSECURITY #PCNSE #PCNSA #PALOALTONETWORKS

Samer R.Saleem


Automating Network Configurations with Jinja2 and Python: A Step-by-Step Guide

 In this post, I worked on collecting a code that works with Jinja template. the nice thing in working with Jinja is that you can have basel...