Showing posts with label PCNSE. Show all posts

Thursday, September 14, 2023

Fetching Firewall Data Using cURL and Postman for API Access

 you can use curl from your terminal for example:

samer@Samers-MacBook-Pro ~ % curl -X GET 'http://192.168.1.250/api/?type=op&cmd=<show><system><info></info></system></show>' -u "api:password@199"

note that the -u the two words api and password@199 are username and password to authenticate the session while trying to fetch data from firewall while using CURL.


or, you can use the Postman app.


Monday, June 7, 2021

Change Global Protect portal logo

 It is nice and good idea to replace the Global Protect logo to your company logo.

to be more professional and to give better impression about your company attention to details.


in this post, I will be showing you how to do that:

First of all you need to have global protect portal (web based VPN page) enabled.

go to : Network > Global Protect > Portals > General

As you can see  > you should have the interface (outside) and it's IP address 

under appearance: Portal Login Page is set to customized-page.html


Note, in your case you would not see the custom page in the drop list because you did not create it yet.

here is how to create this page:

Go to Device > Response pages >

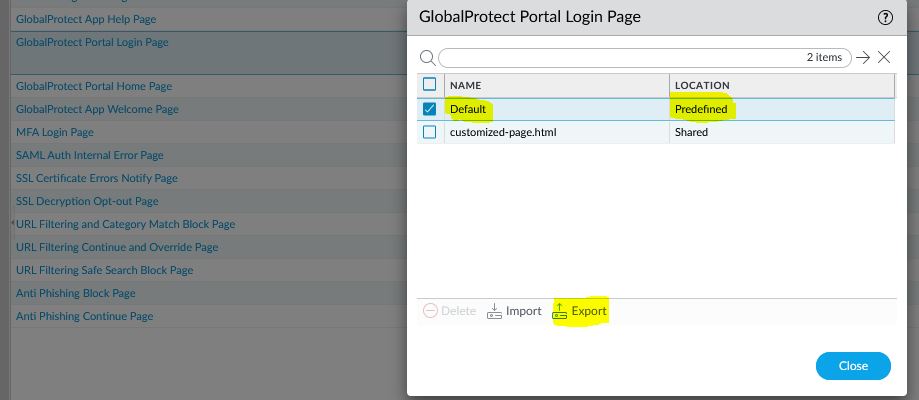
you will find a list of pages used in your firewall, find and click on Global Protect Portal Login Page

then, select the "Default" and export as shown in the image below:


Once you downloaded it, you can open the ".html" page that you downloaded and edit with texteditor

as you can see below:

change the image source to a different source than the original one, in my case I'm recalling it from the link of a server lab, you can see the highlighted link below:


 once you finished editing this page, save it as (NAME.html)

Go again to Response Pages and select Global Protect portal login page:


Now you can go to the first step and select the new customized page from the drop list and commit your configs.

Hope this was useful!

Samer R. Saleem

Saturday, June 5, 2021

NATing same IP public address for different service (port forwarding)-Destination NAT

05/06/2021

Author: Samer R. Saleem

Subject: NATing per service (port forwarding)


As you might see on another posts, Network requirements change from time to time, which will impose new changes each time.

One of the new scenarios that came into my table was allowing a remote sever to access three finger print devices that works with UDP service.


Of course, I need to make use of my public IP and not waste IP addresses, and sure, the obvious solution for this requirement would be the Network Address translation (NAT).


The following diagram represents the idea of the connection:


 So, our target is to translate the incoming connection according to the requested service:

or example:

if the connection was for the IP: X.X.X.X with UDP port 5500, the Firewall will translate the connection destination to 10.10.180.11


if the connection was for the IP: X.X.X.X with UDP port 5501, the Firewall will translate the connection destination to 10.10.180.12


Finally, if the connection was for the IP: X.X.X.X with UDP port 5502, the Firewall will translate the connection destination to 10.10.180.13


Login to firewall user interface
go to policies > NAT > add

to add a rule with the name of finger print device do the following:
source zone outside destination outside  (the first outside is the internet, the second one is Interface outside of the firewall)
destination IP is X.X.X.X  (which is a real public IP address that you will use to make port forwarding)
service must be (5500, 5501, 5502) 
>>> (if not defined, you can define under objects tab). 

screenshot on how to do that:


here is how to configure and will use the first finger print device in my examples:

Source is outside > destination outside with port > 5500

destination address is the PUBLIC IP (X.X.X.X)

now, go to next tab (Translated Packet), which will take action after the packets translated and will redirect the traffic to internal IP address of the Finger print device1

fill the details as below, and then press OK


 once you done this for device1 you can repeat the process for the other devices.


then allow security access rule
go to security policy
add a new rule
source zone outside, address any to inside zone destination is 95.159.105.100 service ports are 5500,5501,5502 > action is allow


then commit configs


Hope this was useful!


Samer R. Saleem


Automating Network Configurations with Jinja2 and Python: A Step-by-Step Guide

 In this post, I worked on collecting a code that works with Jinja template. the nice thing in working with Jinja is that you can have basel...