Thursday, August 20, 2020

Decryption Policy on PaloAlto Firewall


SSL Decryption is a feature that is used by the Firewalls and web gateways to inspect encrypted traffic such as HTTPS, the SSL decryption will make the firewall work as a proxying the user for the traffic to remote destinations and requests.

NOTE: SSL Scan/inspection can cause high impact on the Firewall resources and might cause network interruption if misconfigure.


With that been said, Firewall will for sure need to create two sessions

1.       From user to firewall

2.       From firewall to remote site

So, the firewall must have a certificate created in order to be installed on the user computer or Mobile device, to do that you will need to do the following:

Device > Certificate Management > certificates > Generate


the IP should be the inside interface IP address of the firewall.


Now this certificate will not be used until we implement the decryption policy.

To create the decryption policy we will:

Go to > Policies > Decryption > Add

Add the name, source zone and IP address, destination and then the action to decrypt the traffic matching source address.


Now that we have created the policy, the IP matched in it will not be able to go www.youtube.com unless the certificate created by the Firewall is installed, and below message will be seen once the firewall start inspecting the traffic, if you select “NO” then the traffic will not pass and will be dropped.


Ok, How to install the certificate on the computer or mobile?

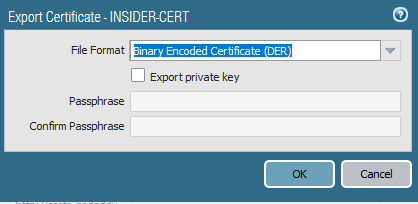
What I have done is exporting the certificate I generated at the beginning, saved locally on my computer, and then imported it on the computer as trusted certificate.

Go to Device > Certificate management > certificates.

Select the certificate and then export .der file and then install this file on the device you need to make SSL inspection on.

 
I hope this was helpful!


Samer R. Saleem

Tuesday, August 18, 2020

Configure PaloAlto Destination NAT and security policy for Email Exchange

 In this post, I will be configuring the rules needed to configure PaloAlto firewall in order to make NAT works for the following:

1. Incoming emails NAT rule which works with IP X.X.X.X and port SMTP (25)

2. Incoming webmail sessions on the exchange, NAT rule which works with same IP X.X.X.X but port HTTPS

by doing this, the firewall will be translating the incoming sessions based on the destination port.

if the session was started to target HTTPS, then firewall will send the traffic to internal exchange private IP address 10.10.10.20.

if the session was targeting SMTP on port (25) then firewall will be sending the traffic to DMZ zone which contains the Email security gateway. (in my case it is brightmail from symantec)


Ok, now it's time to show some NAT rules configured for this:

1. Configuring the NAT rule for the incoming emails:

incoming traffic (original packet) on outside interface with service tcp 25 on the public IP address of the exchange server


will be translated to > Brightmail in DMZ private IP with port also translated to TCP 25


2.Configure security rule for incoming email:

outside to > inside with the source of public ip address of the exchange and port https is allowed

outside to > inside with source of public ip address of the exchange and port of SMTP is allowed


3. configure NAT rule for the incoming web sessions

same as smtp applies but for different port (https) and translated to different destination which will be the exchange private internal address


Now, let's configure the security policy for both email and webmail:


at the end, the NAT rules will be looking like below:


Samer R. Saleem

Gather information from Switches using Python - Network Programmability

 In this post, I'm going to use Python and Telnet Library to login into a list of IP addresses and execute some commands and send the output to separated text files.


 My network contains HP access switches and I need to collect some information like product number or serials from each IP in the file called (hpswitch.txt).

ok, let's start


#!/usr/bin/env python
import getpass
import telnetlib

user = ("Admin")
password = ("password")

f = open ("C:\\Users\\user.name\\Desktop\\python\\hpswitch.txt")

for line in f:
    print "Getting Serials from Device  " + (line)
    HOST = line.strip()
    tn = telnetlib.Telnet(HOST)

    tn.read_until("Username:")
    tn.write(user + "\n")
    if password:
        tn.read_until("Password:")
        tn.write(password + "\n")


     #this section is the switch configuration part
    tn.write("super \n")
    tn.write("password\n")
#tn.write("system-view \n")

    tn.write("dis dev manu | in JD368B\n")


    tn.write("quit\n")
#tn.write("quit\n")
    readoutput = tn.read_all()


    saveoutput = open("C:\\Users\\user.name\\Desktop\\serials\\switch" + HOST + ".txt", "w")


    saveoutput.write(readoutput)
    saveoutput.write("\n")
    saveoutput.close

print tn.read_all()

 =================================================================


Same code can be used for checking interfaces or uplinks states.


Samer R. Saleem 

Automating Network Configurations with Jinja2 and Python: A Step-by-Step Guide

 In this post, I worked on collecting a code that works with Jinja template. the nice thing in working with Jinja is that you can have basel...